AK_Brickster's Castle WIP
Mar 27, 2015 8:47:37 GMT -8
Schmidt, Sir Caedric Moore, and 4 more like this
Post by AK_Brickster on Mar 27, 2015 8:47:37 GMT -8
3/27/15
I know what you're thinking, "Whaaaaat??? AK_Brickster is BUILDING something?!?!?"
Yes, it's true!
I finally got my collection completely sorted and am just starting out with laying out my biggest project ever!
This will be a stand-alone keep that will (hopefully) someday become part of a much larger layout with landscaping, civilian buildings, etc.
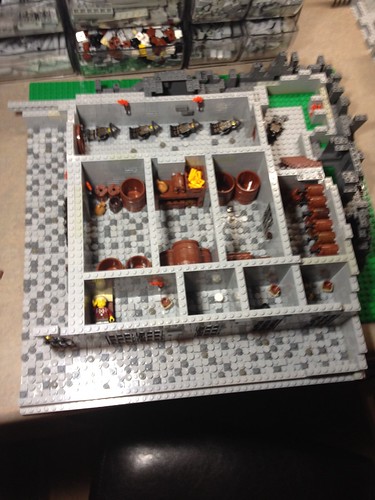
The first thing to do is to layout the floor plan for the "basement". In the photo below, I have (from top to bottom) dungeon, store room (with secure area to far left for wine storage), servant's quarters (laid out for 8 beds - maybe bunks?) with lead servant having his own quarters and private stairwell to far left.
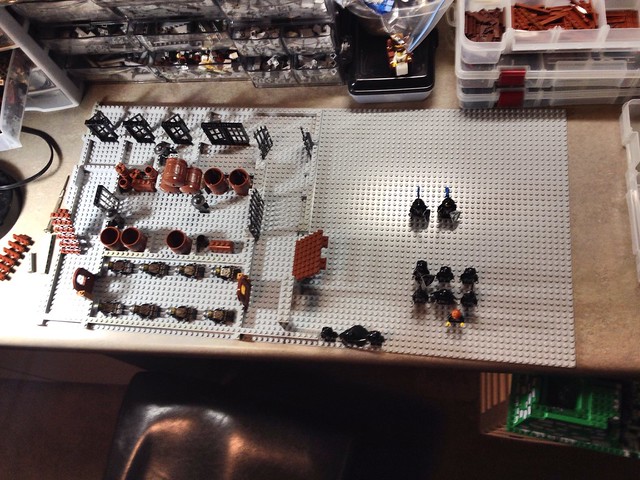
I've got a double-wide main staircase set up and will have an arched 6-wide opening on either side of it leading to the right half, which is obviously not laid out yet.
I'm thinking the right half should have some room for barracks, an armory, and probably a secret treasure room, which will have a hidden entrance (false wall?) and secret staircase that leads to the King's chambers above.
The actual build will likely have some form of turret at each corner, so I'll add those next. They will prodtrude out from the 48x96 layout, so I'll have to use some small base plates to frame them out with.
I want this to have a full interior with "functional" stairs/accesses to every room/level. Because of this, I would like to build it so that each level can be lifted off independently to view the inside, and maybe to hinge open down the middle as well. Hinging would probably preclude me from using the big baseplates and would make things trickier to build, but might be worth it for convention display purposes, since it's hard to lift off sections for everyone to see during a convention.
Any tips/suggestions on layout are appreciated. I will keep this post updated with progress photos at the top of the post, and will bump the old info down to the bottom of the post as I go, so you won't have to scroll through all of the old stuff every time.
Wish me luck!!
3/30/15
So I've done a test-run of the floor technique that I'm planning on using for the basement, and the feedback on Flickr was to remove the 2x2 jumper plates and maybe replace them with round 2x2 tiles. I will try that out and then do the rest of the basement floor before the walls get tall enough to make attaching tiny studs prohibitive.
Floor experiment. Feedback appreciated. by AK_Brickster, on Flickr
SEdmison suggested putting dark tan plates underneath the cobblestones, but unfortunately I don't have enough dark tan to cover two 48x48 baseplates, so we'll have to do without this time.
4/6/15
I didn't get a ton of work done on this over the weekend, but I did manage to cobble most of one base plate (the one shown in the pic), including removing the 2x2 jumper plates and replacing with more 1x1 plates/tiles.
I also built out the storage area and prison cells a little bit, adding some shelves to the storage area, anchoring the laid-down barrels to the wall so they won't fall over when moving the MOC, and adding a small bed to the largest prison cell that I'm considering to be for higher-class political prisoners. Each prison cell also got a "honey-bucket".
My goal is to get all of the furnishings and floor tiling/cobbling done before the walls get tall enough to make placing those items prohibitive.
I also have a small BrickLink order coming in with some light bley prison door frames so that I can use those in place of the black ones that are placeholders in the most recent photo.
More photos coming soon
4/9/15
Last night I managed to cobble most of the remaining rooms and also swapped out the black prison doors with the new light bley ones that came in.
Finished up the store room shelves and added tapped caskets to the secure wine room at the back of the store room.
Added some prisoners to the dungeons, including a noble, who is enjoying some sleep in his relatively luxurious cell.
WIP - left half of basement by AK_Brickster, on Flickr
Next task will be to build beds for the servants' chamber and also to build out the servant-master's room. I've got some green baseplate intruding into the servant-master's room, so I will have to figure out how to cover that up without messing up my floor elevations. I will then finish the remaining walls to full-height and start on the second half, which is on a separate baseplate (in case that isn't obvious )
)
Another thing I have to be mindful of is how the two halves will join together. My plan is to make this modular, but being that the halves are so bulky, the joining mechanism needs to be kind of beefy. I'm thinking of having a couple of technic beams overlap and then use an axle or pin through them to keep the halves together.
More to come soon!
6/20/15
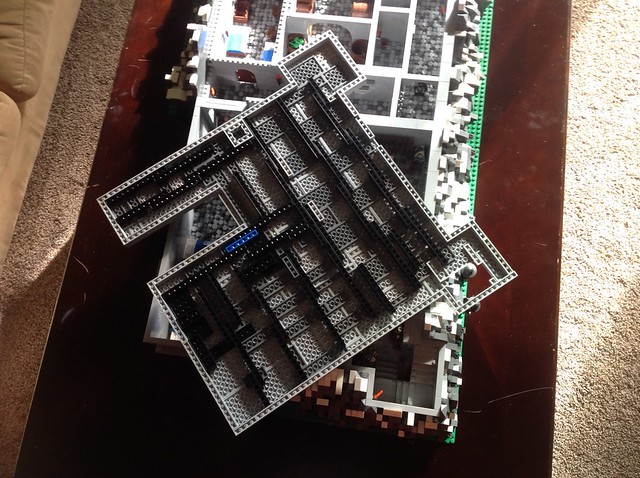
A lot has been accomplished since my last update, though not as much as you'd expect over 2 1/2 months. The "basement" is now pretty much finished. Rock needs to be built around the outside, and a few walls need to be built up to grade. The second half of the basement features a large barracks-type room for resting soldiers, an armory, a main staircase to the upper floors, a guardrobe, and a hidden treasure room, complete with secret entrance!
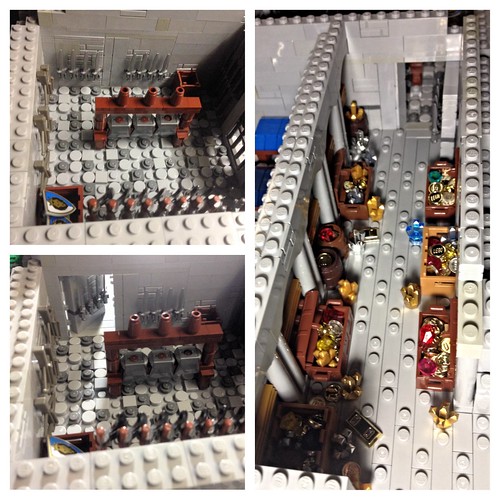
Castle WIP - secret passage to treasure room by Jordan, on Flickr
Here is a link to an overview photo: www.flickr.com/photos/ak_brickster/18371699243/
8/10/2015
Big update!
I ran out of 8x16 base plates to add the exterior rocks on with, so I finished up all of the rock work that I could, added snow, finished the basement walls, and started working on the floor for the next tier.
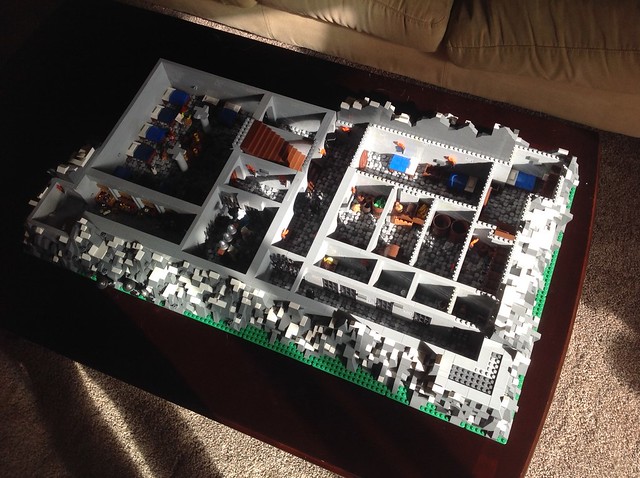
Castle WIP 8-10-15 by Jordan, on Flickr
I built a frame of technic beams and plates, and then tiled the whole footprint with light gray plates. Safe to say I am going to need a LOT more plates before this project is done.
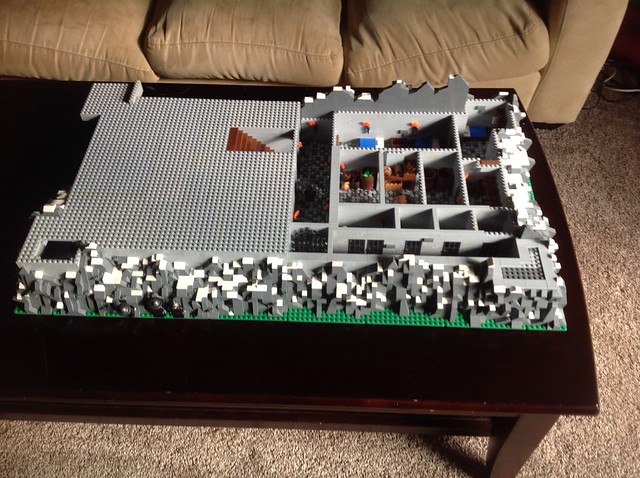
Castle WIP 8-10-15 by Jordan, on Flickr
Castle WIP 8-10-15 by Jordan, on Flickr
Leaving the openings for the stairwells was a little tricky, but I got it to work out. Getting the secret trap door to hinge open without binding up was not working out, so I decided that there will just be a tile "rug" that will lift out to reveal the staircase.
More base plates are on the way, so once those arrive I will fall back to doing rocks around the last two sides, which will give me some time to figure out my room layout for the next floor.
What do you think should go on this main floor? I'm thinking kitchen, throne room and banquet hall, for starters.
9/11/2015
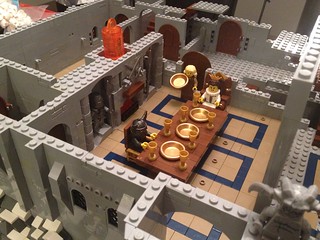
Work on the "ground floor" is coming along pretty nicely. I've completed the banquet hall (with working fireplace) and more or less figured out the layout of where all of the rooms/stairs/doors will be on one half of the castle. The two left-most towers are built up to the full first-floor height, as is the far left wall. I added a small backdoor with dock on the back of the castle just to add some visual interest, as I'm anticipating that I'll be battling to avoid the "big gray wall" syndrome on the back side.
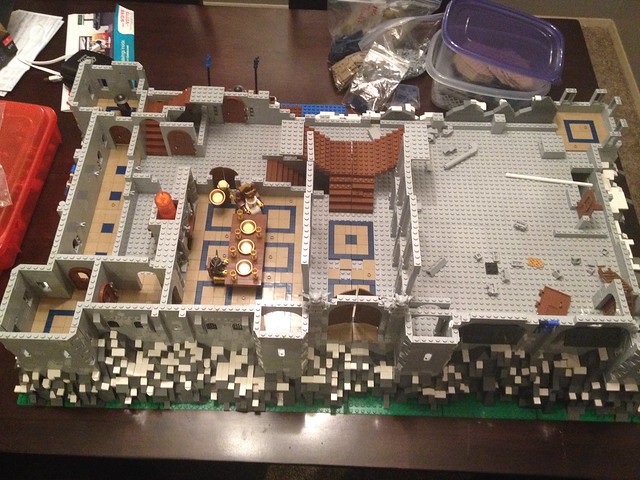
Castle WIP update 9/10 by Jordan, on Flickr

Castle WIP update 9/10 by Jordan, on Flickr
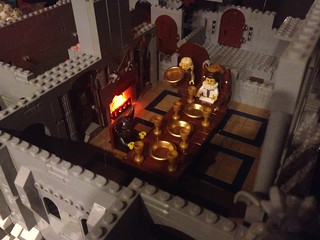
The banquet hall has a large table that will accommodate 8 chairs, and it has a light-up fireplace, flanked by two recessed statues/suits of armor.
The light for the fireplace is a re-purposed "glow stick" that I bought on clearance last year after Halloween. The actual light is in the "handle", and the "glow stick" part is just a hollow tube of plastic, so I cut the light stick down to about 1/2 inch and drilled a hole in it that will accept a technic pin. This is then pinned into the chimney, which allows me to turn the light on and off by twisting the handle.
Castle WIP update 9/10 by Jordan, on Flickr
Castle WIP update 9/10 by Jordan, on Flickr
More progress should come this weekend. I am planning on having this done by late September.
9/29/15
The castle is nearing completion, and is so close to being done that I am going to make you wait to see the finished product.
In the meantime, here's a final WIP/teaser to whet your appetite...
Final Castle WIP / Teaser by Jordan, on Flickr
I know what you're thinking, "Whaaaaat??? AK_Brickster is BUILDING something?!?!?"
Yes, it's true!
I finally got my collection completely sorted and am just starting out with laying out my biggest project ever!
This will be a stand-alone keep that will (hopefully) someday become part of a much larger layout with landscaping, civilian buildings, etc.
The first thing to do is to layout the floor plan for the "basement". In the photo below, I have (from top to bottom) dungeon, store room (with secure area to far left for wine storage), servant's quarters (laid out for 8 beds - maybe bunks?) with lead servant having his own quarters and private stairwell to far left.
I've got a double-wide main staircase set up and will have an arched 6-wide opening on either side of it leading to the right half, which is obviously not laid out yet.
I'm thinking the right half should have some room for barracks, an armory, and probably a secret treasure room, which will have a hidden entrance (false wall?) and secret staircase that leads to the King's chambers above.
The actual build will likely have some form of turret at each corner, so I'll add those next. They will prodtrude out from the 48x96 layout, so I'll have to use some small base plates to frame them out with.
I want this to have a full interior with "functional" stairs/accesses to every room/level. Because of this, I would like to build it so that each level can be lifted off independently to view the inside, and maybe to hinge open down the middle as well. Hinging would probably preclude me from using the big baseplates and would make things trickier to build, but might be worth it for convention display purposes, since it's hard to lift off sections for everyone to see during a convention.
Any tips/suggestions on layout are appreciated. I will keep this post updated with progress photos at the top of the post, and will bump the old info down to the bottom of the post as I go, so you won't have to scroll through all of the old stuff every time.
Wish me luck!!

3/30/15
So I've done a test-run of the floor technique that I'm planning on using for the basement, and the feedback on Flickr was to remove the 2x2 jumper plates and maybe replace them with round 2x2 tiles. I will try that out and then do the rest of the basement floor before the walls get tall enough to make attaching tiny studs prohibitive.
Floor experiment. Feedback appreciated. by AK_Brickster, on Flickr
SEdmison suggested putting dark tan plates underneath the cobblestones, but unfortunately I don't have enough dark tan to cover two 48x48 baseplates, so we'll have to do without this time.
4/6/15
I didn't get a ton of work done on this over the weekend, but I did manage to cobble most of one base plate (the one shown in the pic), including removing the 2x2 jumper plates and replacing with more 1x1 plates/tiles.
I also built out the storage area and prison cells a little bit, adding some shelves to the storage area, anchoring the laid-down barrels to the wall so they won't fall over when moving the MOC, and adding a small bed to the largest prison cell that I'm considering to be for higher-class political prisoners. Each prison cell also got a "honey-bucket".
My goal is to get all of the furnishings and floor tiling/cobbling done before the walls get tall enough to make placing those items prohibitive.
I also have a small BrickLink order coming in with some light bley prison door frames so that I can use those in place of the black ones that are placeholders in the most recent photo.
More photos coming soon

4/9/15
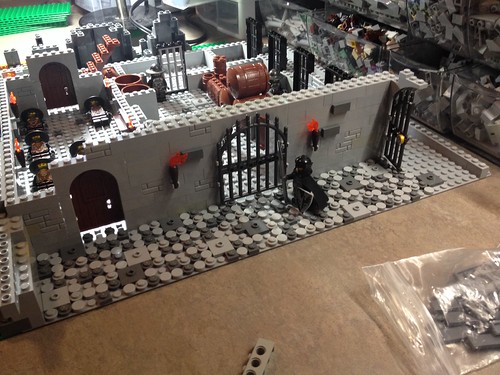
Last night I managed to cobble most of the remaining rooms and also swapped out the black prison doors with the new light bley ones that came in.
Finished up the store room shelves and added tapped caskets to the secure wine room at the back of the store room.
Added some prisoners to the dungeons, including a noble, who is enjoying some sleep in his relatively luxurious cell.
WIP - left half of basement by AK_Brickster, on Flickr
Next task will be to build beds for the servants' chamber and also to build out the servant-master's room. I've got some green baseplate intruding into the servant-master's room, so I will have to figure out how to cover that up without messing up my floor elevations. I will then finish the remaining walls to full-height and start on the second half, which is on a separate baseplate (in case that isn't obvious
 )
)Another thing I have to be mindful of is how the two halves will join together. My plan is to make this modular, but being that the halves are so bulky, the joining mechanism needs to be kind of beefy. I'm thinking of having a couple of technic beams overlap and then use an axle or pin through them to keep the halves together.
More to come soon!
6/20/15
A lot has been accomplished since my last update, though not as much as you'd expect over 2 1/2 months. The "basement" is now pretty much finished. Rock needs to be built around the outside, and a few walls need to be built up to grade. The second half of the basement features a large barracks-type room for resting soldiers, an armory, a main staircase to the upper floors, a guardrobe, and a hidden treasure room, complete with secret entrance!
Castle WIP - secret passage to treasure room by Jordan, on Flickr
Here is a link to an overview photo: www.flickr.com/photos/ak_brickster/18371699243/
8/10/2015
Big update!
I ran out of 8x16 base plates to add the exterior rocks on with, so I finished up all of the rock work that I could, added snow, finished the basement walls, and started working on the floor for the next tier.
Castle WIP 8-10-15 by Jordan, on Flickr
I built a frame of technic beams and plates, and then tiled the whole footprint with light gray plates. Safe to say I am going to need a LOT more plates before this project is done.
Castle WIP 8-10-15 by Jordan, on Flickr
Castle WIP 8-10-15 by Jordan, on Flickr
Leaving the openings for the stairwells was a little tricky, but I got it to work out. Getting the secret trap door to hinge open without binding up was not working out, so I decided that there will just be a tile "rug" that will lift out to reveal the staircase.
More base plates are on the way, so once those arrive I will fall back to doing rocks around the last two sides, which will give me some time to figure out my room layout for the next floor.
What do you think should go on this main floor? I'm thinking kitchen, throne room and banquet hall, for starters.
9/11/2015
Work on the "ground floor" is coming along pretty nicely. I've completed the banquet hall (with working fireplace) and more or less figured out the layout of where all of the rooms/stairs/doors will be on one half of the castle. The two left-most towers are built up to the full first-floor height, as is the far left wall. I added a small backdoor with dock on the back of the castle just to add some visual interest, as I'm anticipating that I'll be battling to avoid the "big gray wall" syndrome on the back side.
Castle WIP update 9/10 by Jordan, on Flickr
Castle WIP update 9/10 by Jordan, on Flickr
The banquet hall has a large table that will accommodate 8 chairs, and it has a light-up fireplace, flanked by two recessed statues/suits of armor.
The light for the fireplace is a re-purposed "glow stick" that I bought on clearance last year after Halloween. The actual light is in the "handle", and the "glow stick" part is just a hollow tube of plastic, so I cut the light stick down to about 1/2 inch and drilled a hole in it that will accept a technic pin. This is then pinned into the chimney, which allows me to turn the light on and off by twisting the handle.
Castle WIP update 9/10 by Jordan, on Flickr
Castle WIP update 9/10 by Jordan, on Flickr
More progress should come this weekend. I am planning on having this done by late September.
9/29/15
The castle is nearing completion, and is so close to being done that I am going to make you wait to see the finished product.
In the meantime, here's a final WIP/teaser to whet your appetite...
Final Castle WIP / Teaser by Jordan, on Flickr


 !?? Anyway looking forward to it, my favorite part will most likely be the secret treasure room


 This looks very promising, Jordan.